The Complete Pool Opening Guide for Hudson Valley Homeowners
How do you open a pool for the season? To open a pool for the season: (1) remove and clean the winter cover, (2) remove freeze plugs from returns and skimmer, (3) reconnect and prime the pump, (4) reinstall the filter and heater, (5) fill to proper water level, (6) shock the pool and add algaecide, (7) test and balance water chemistry (pH, alkalinity, calcium hardness, cyanuric acid), (8) run the system for 24–48 hours before swimming.
When Should You Open Your Pool in the Hudson Valley?
Timing your pool opening correctly is one of the most impactful decisions you'll make each swim season — and it's something a lot of Hudson Valley homeowners get wrong.
The common assumption is to wait until the weather feels warm enough to swim. But the right trigger isn't air temperature for you — it's water temperature for algae.
The rule: open your pool when nighttime water temperatures are consistently staying above 50°F.
Below 50°F, algae cannot grow. Above it, algae can begin to bloom under your cover even without sunlight — and a pool that's been sitting under a cover all winter with unbalanced chemistry is the perfect environment for a spring algae explosion that costs hundreds of dollars in chemicals to treat.
For most of the Hudson Valley — Ulster County, Dutchess County, Orange County, and surrounding areas — that threshold hits somewhere between late April and mid-May, depending on the year. In warmer springs, late April is realistic. In the colder years we see in the Catskills and higher elevations, mid-May is more typical.
The practical advice: Don't open by calendar date. Open by water temperature. And book your professional pool opening service in March so you have a slot when the temperature window arrives — because opening schedules in the Hudson Valley fill up fast in May.
The Complete Pool Opening Checklist — Step by Step
Use this as your master reference for every spring opening. Whether you're handling it yourself or working with a professional, these steps need to happen in roughly this sequence.
Step 1 — Remove and Clean Your Winter Cover
Pull the cover off carefully, keeping it off the grass if possible to avoid staining. Drain any standing water from the cover surface using a cover pump before removal — a waterlogged cover is heavy and difficult to handle without dumping dirty water into your pool.
Clean the cover with a pool cover cleaner or mild soap, allow it to dry completely, and store it in a bag or container that protects it from rodents and mildew. A cover that gets folded away wet or dirty will degrade significantly faster.
What to look for: Inspect the cover for tears, pulled grommets, or damage. A cover with significant wear may need replacement before next fall's pool closing.
Step 2 — Remove All Winterizing Plugs
Freeze plugs were installed in every return fitting, skimmer throat, and main drain line during your fall pool winterization. Every single plug needs to come out before the system is turned on.
Missed plugs are one of the most common DIY opening errors. A freeze plug left in a return fitting will block flow and cause pressure to build in that line when the pump is running. In some cases it can damage fittings or cause the plug to blow out with enough force to injure someone.
Check returns: all eyeballs reinstalled. Check skimmers: baskets in, throat clear. Check main drain: plug removed and fitting intact.
Step 3 — Reconnect and Inspect All Equipment
Before you turn anything on, do a visual inspection of your entire equipment pad:
- Pump: check the strainer basket, inspect the lid o-ring, look for cracked housing or loose unions
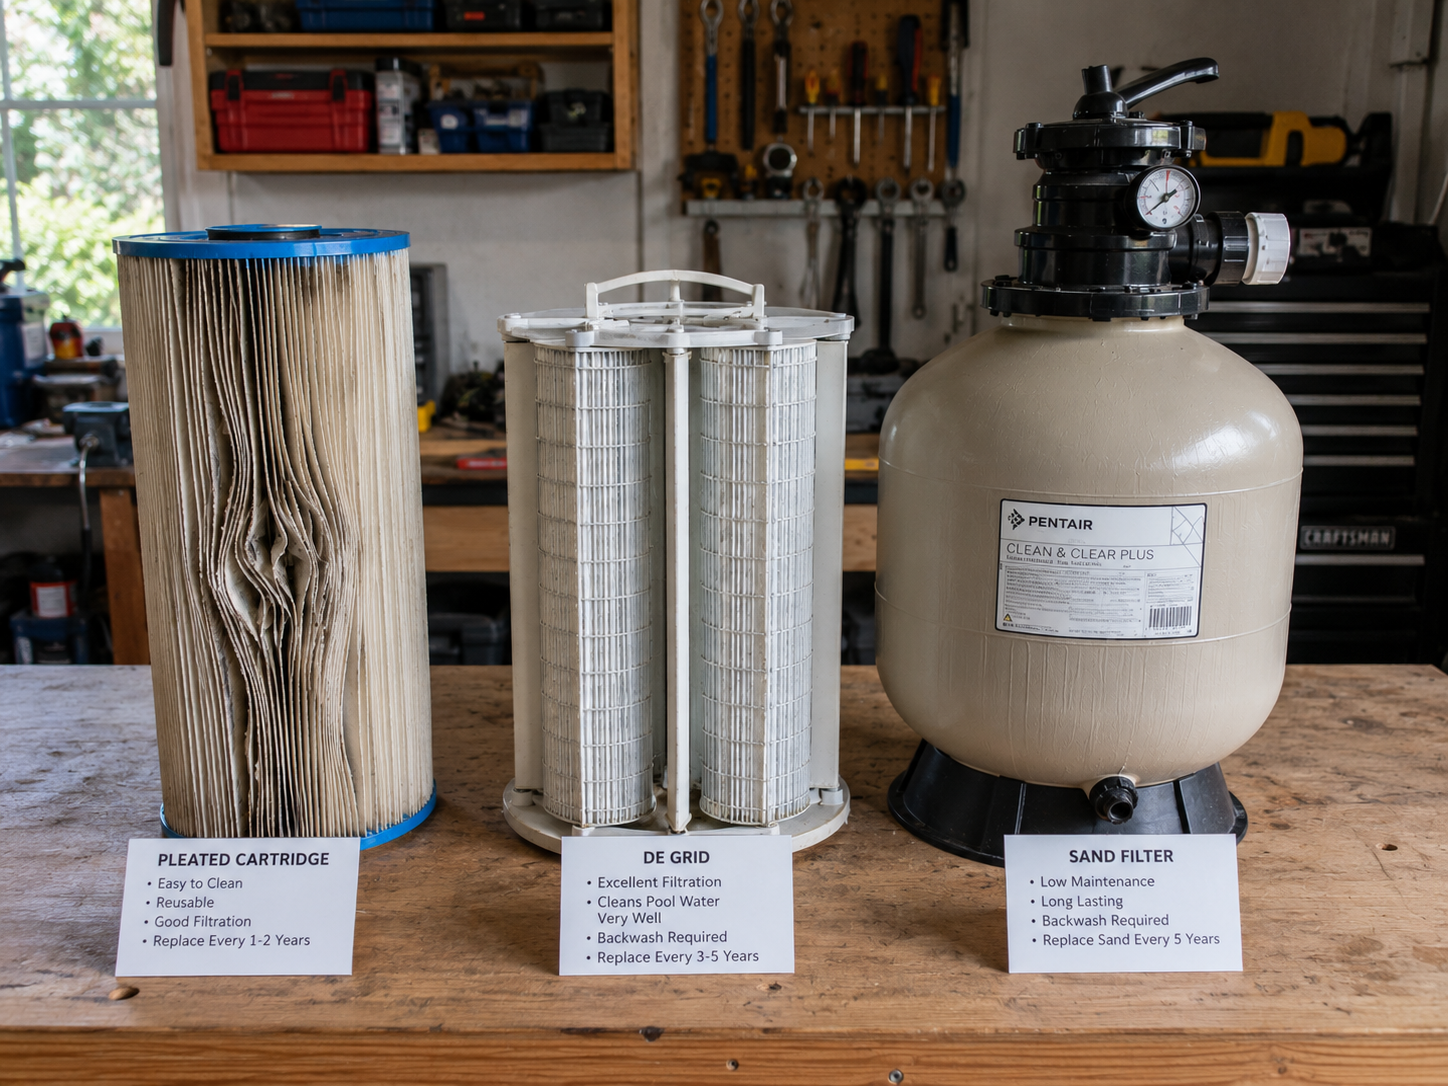
- Filter: reinstall any cartridges or DE grids that were removed for winter; check the multiport valve for cracking around the spider gasket
- Heater: reconnect gas supply, inspect the heat exchanger for mineral deposits, check the pressure switch
- Chlorinator or salt cell: reconnect and inspect for scale buildup
- Automation system: restore power and verify programming
Look for any cracking, corrosion, or weeping at fittings and unions. Winter is hard on equipment, and the opening is your best opportunity to catch problems before they become mid-season emergencies. If you notice a pump issue during your inspection, address it before running the system.
Step 4 — Fill the Pool to Proper Water Level
Your pool was lowered below the skimmer during winterization. Refill to the midpoint of the skimmer opening — this is the proper operating level that allows the skimmer to skim surface debris effectively.
Use a garden hose to fill and monitor the level. Don't leave it unattended — overfilling causes its own set of problems including reduced skimming efficiency and water spilling onto the deck.
Step 5 — Prime the Pump and Start the System
With everything reconnected and the pool filled:
- Open all valves to the normal operating position
- Fill the pump strainer basket with water to help prime it
- Start the pump and watch for water flow at the returns within 60–90 seconds
- If the pump doesn't prime within 2 minutes, shut it off — running a dry pump damages the seal and impeller
Once water is circulating, check every fitting and union for drips. A small drip at startup can become a significant leak once the system runs at full pressure.
Run the system continuously for the first 24 hours of opening to circulate opening chemicals and clear the water.
Step 6 — Add Opening Chemicals
With the pump running, add your opening chemical treatment in this order:
- Pool shock (calcium hypochlorite or non-chlorine shock) — added directly to the pool water while the pump is running. This kills any bacteria and algae that developed over winter and burns off combined chlorine.
- Algaecide — a preventive dose to inhibit any algae spores present in the water column.
- Stain and scale preventer — especially important in the Hudson Valley where mineral-rich well water is common. This prevents metal staining and calcium scale on your pool surface and equipment.
Do not add all chemicals at the same spot in the pool. Distribute them around the perimeter while the pump runs to help disperse them evenly.
Step 7 — Test and Balance Your Water Chemistry
This is the most critical and most commonly rushed step of the pool opening process. Adding chemicals without testing first is like prescribing medication without a diagnosis — you might help, or you might make things significantly worse.
Get a full water chemistry test — either with a reliable test kit, test strips (less accurate), or by bringing a water sample to a professional water testing service. The complete panel you need:

Why this order matters: Adjust total alkalinity first, then pH, then calcium hardness, then add chlorine. Adding chlorine to an unbalanced pool dramatically reduces its effectiveness — you'll use twice as much chemical to achieve the same result.
Hudson Valley pools often need calcium hardness adjustment in spring — our water tends to be soft, which is corrosive to plaster and metal surfaces. Don't skip this test.
Step 8 — Clean the Pool
With chemistry circulating, vacuum the pool to waste (bypassing the filter) to remove any debris, sediment, or algae that settled during winter. Brush all walls and the floor to dislodge any material clinging to the surface. Empty and clean the skimmer basket and pump strainer basket after the initial run.
Run the filter continuously until the water clears — typically 24–72 hours depending on how clean the water was at opening.
Pool Opening Water Chemistry: The Full Guide
Understanding why each chemistry parameter matters helps you make better decisions and catch problems before they escalate.
pH — The Foundation of Everything
pH controls how effective chlorine is. At a pH of 7.2, roughly 65% of your chlorine is in the active, sanitizing form. At a pH of 7.8, that drops to about 25%. High pH essentially neutralizes your chlorine without you using any less of it.
Low pH (below 7.0) makes water corrosive — it etches plaster surfaces, corrodes metal fittings, and irritates swimmers' eyes and skin.
Raise pH with soda ash (sodium carbonate). Lower pH with muriatic acid or dry acid (sodium bisulfate). Always adjust gradually — move no more than 0.2 pH units per treatment and retest before adding more.
Total Alkalinity — pH's Stabilizer
Alkalinity acts as a buffer that keeps pH stable. Without adequate alkalinity (80–120 ppm), pH swings wildly with every rain, splash, or chemical addition. This phenomenon — called "pH bounce" — makes water chemistry nearly impossible to maintain.
Low alkalinity is corrected with sodium bicarbonate (baking soda). High alkalinity is corrected with muriatic acid, added slowly with the pump running.
Calcium Hardness — Protecting Your Pool Surface
Calcium hardness measures the dissolved calcium in your water. Too low and the water actively seeks calcium from the nearest available source — which is your pool plaster, tile grout, and metal fittings. Too high and calcium scale deposits form on surfaces and inside your equipment.
Hudson Valley pools frequently open with low calcium hardness due to our naturally soft water. Raise it with calcium chloride added directly to the pool water with the pump running. Lower it by diluting the pool with fresh water.
Cyanuric Acid — Chlorine's Sunscreen
Cyanuric acid (CYA) stabilizes chlorine against UV degradation from sunlight. Without CYA, sunlight destroys a significant portion of your pool's free chlorine within hours. With the right CYA level (30–50 ppm), chlorine lasts significantly longer.
Too much CYA — a common problem in pools that use trichlor pucks exclusively — actually inhibits chlorine's effectiveness, a phenomenon called "chlorine lock." The only solution for excess CYA is partial drain and refill.
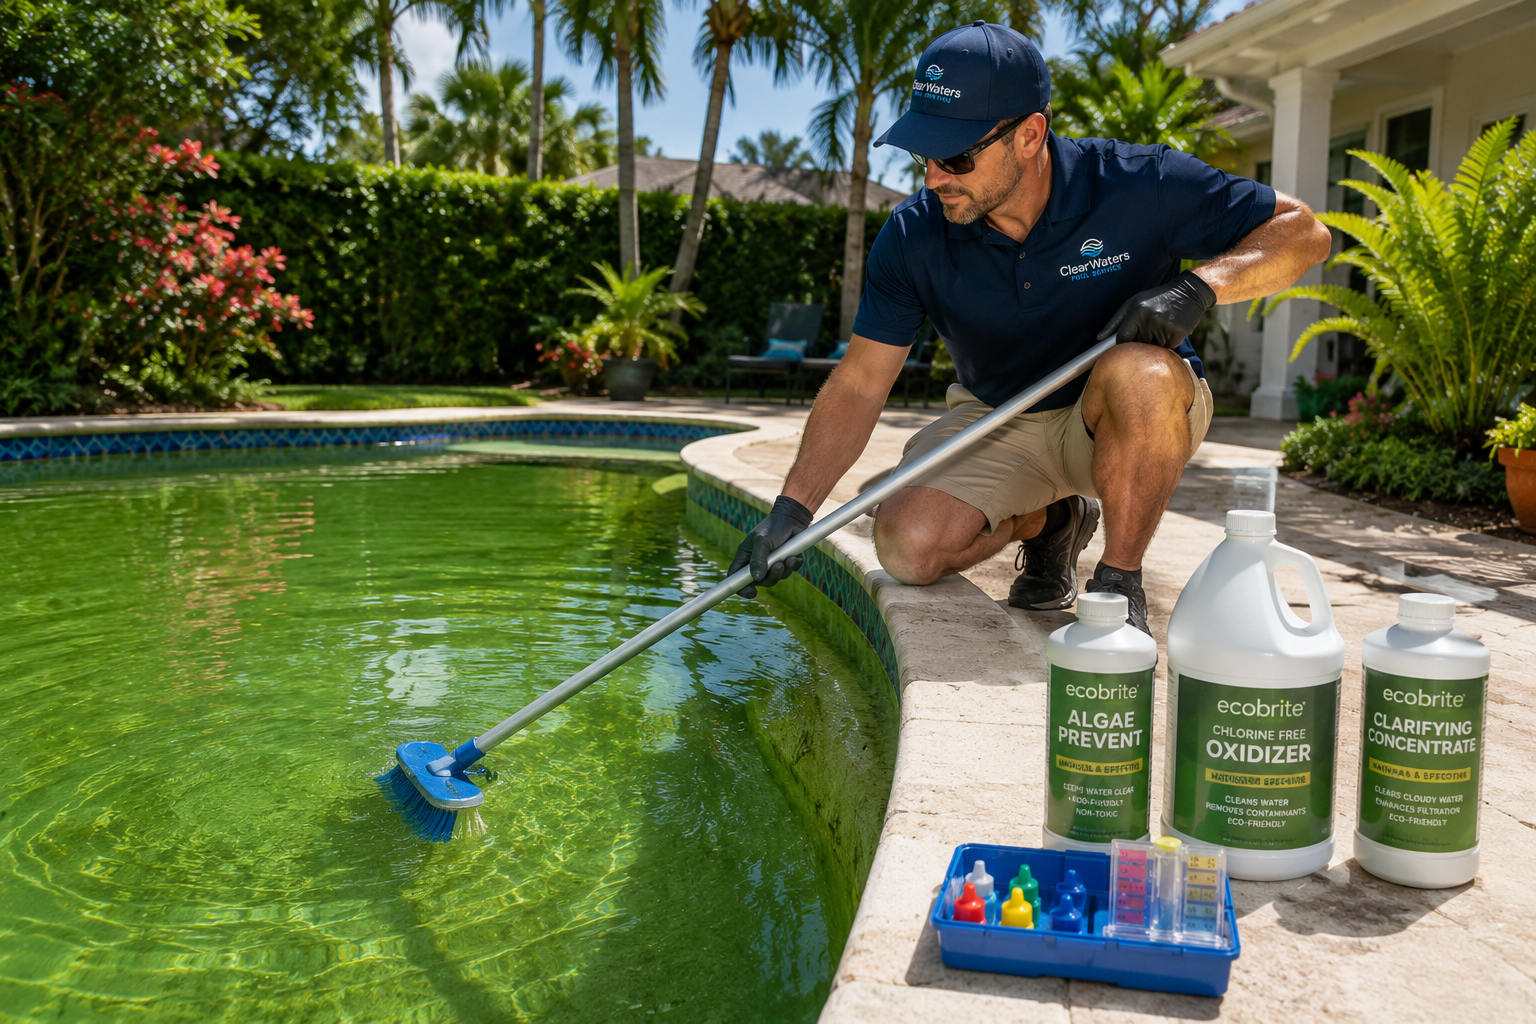
Green Pool at Opening? Here's How to Fix It
If you pull the cover off in spring and find green, murky water, don't panic — and don't drain the pool. This is fixable in most cases.
Step 1: Test the water to understand what you're dealing with. Green water from algae requires aggressive shocking. Green water from metals (common with well-filled pools) requires a different treatment — shocking a metal-heavy pool can cause severe staining.
Step 2: If algae is confirmed, super-chlorinate with a large dose of calcium hypochlorite shock — at least 3 lbs per 10,000 gallons for green water, up to double that for dark green or black algae.
Step 3: Add a pool-grade algaecide and run the pump continuously.
Step 4: Brush the entire pool every 12 hours to expose algae to the chlorine.
Step 5: Backwash or clean your filter frequently — dead algae clogs filter media fast.
Step 6: Retest in 24 hours. If water is clearing, continue running the system. If it's still dark green after 48 hours of treatment, you may need professional assessment.
Severe cases may require a drain-and-refill or a flocculant treatment to drop suspended material to the floor for vacuuming to waste. Our pool service team handles green pool recovery across the Hudson Valley — contact us if the DIY route isn't working.
Pool Opening FAQ
Q: How long after opening can I swim? A: Wait at least 24 hours after adding shock before swimming. The chlorine level needs to drop back to the safe swimming range of 1–3 ppm. Test before anyone gets in.
Q: Do I need to run my filter 24/7 after opening? A: For the first 24–72 hours after opening, yes. Continuous circulation is the fastest way to distribute chemicals and clear the water. Once the water is clear and balanced, you can reduce to your normal daily run time (typically 8–12 hours for Hudson Valley pools in summer).
Q: My pump won't prime after opening — what do I do? A: Check for air leaks at the lid, union fittings, and any valves on the suction side. Make sure all valves are open. Try adding more water directly to the strainer basket before starting. If the pump still won't hold prime after 2–3 attempts, there may be a plumbing or seal issue — contact us for pump repair service.
Q: How much does professional pool opening cost in the Hudson Valley? A: Professional pool opening costs vary based on pool size, condition, and what equipment needs to be reinstalled. Contact us for a specific quote — we serve all of Ulster, Dutchess, Orange, Putnam, Columbia, Greene, and Delaware counties.
Q: Can I open my pool myself or should I hire a professional? A: You can open your own pool if you're comfortable with the equipment and water chemistry process. The main risks are missed freeze plugs, incorrect chemical dosing, and overlooked equipment issues that turn into costly repairs. Professional opening includes a full equipment inspection and written condition report — which catches problems before they become emergencies.
Pool Opening Quick Reference:
- Open when water temp is consistently above 50°F (late April–mid-May in Hudson Valley)
- Remove all freeze plugs before starting the pump
- Shock first, then test and balance chemistry in order: alkalinity → pH → calcium → chlorine
- Run continuously for 24–72 hours until water clears
- Don't swim until chlorine drops to 1–3 ppm